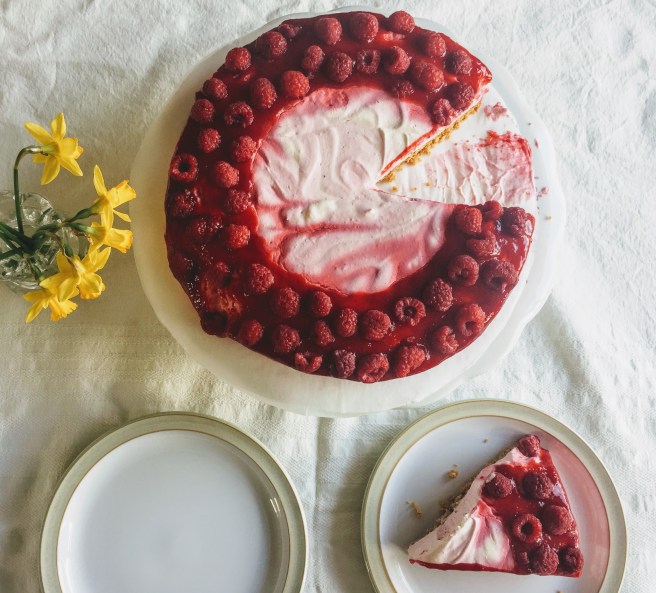
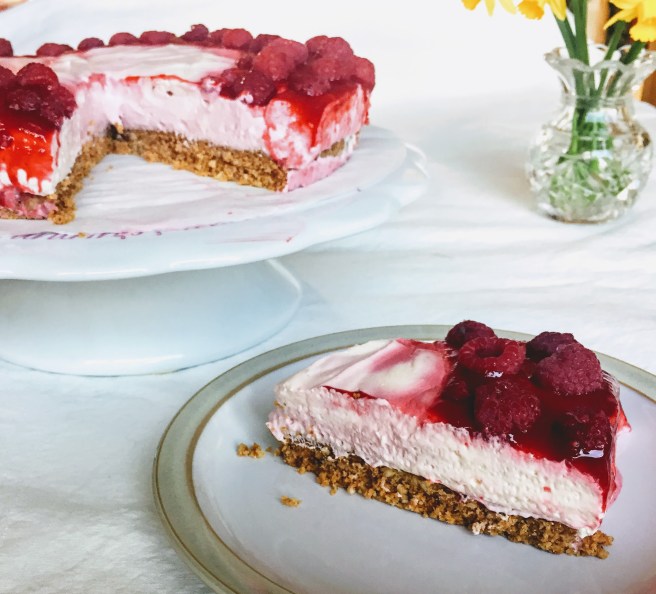
Light, creamy, tangy, fruity and really easy to make, this vegan cheesecake is ideal for a celebration, or just for a day when you fancy cheesecake. A crumbly, biscuity base is piled with swirls of vanilla and raspberry flavoured filling, and topped with a sharp and sweet raspberry coulis.
One of the benefits of living with ones parents is that I am able to spend this Mother’s Day with my Mum, which in these covid-ridden times is even more of a luxury than it would be normally. I wanted to make something that was suitably fancy, but easy enough for anyone to whip up, something indulgent, but light and fruity, to harken the warmer weather to come, and this was the result. Whether you are fortunate enough to be able to see your Mum this Mother’s day, or just need a bit of self-care, this raspberry ripple cheesecake is an excellent option.
This cheesecake is of the no-bake variety, so is a little more soft an airy than its baked counterpart (though if you prefer the baked variety, this white chocolate and blueberry baked cheesecake is wonderful, even though I say so myself). As it’s no-bake, it requires a decent amount of fridge time before serving and if you can leave it overnight, even better.
How to make vegan raspberry ripple no-bake cheesecake
I’m going to give lots of options for substitutions, but the key is a decent vegan cream cheese. These have improved massively since I became vegan, and there’s far more variety than there used to be. Oatly have recently brought out a ‘Creamy Oat Spread’ and the plain version is perfect for this. It doesn’t have any gluten-containing ingredients, but isn’t guaranteed gluten-free. Violife Creamy Original is gluten-free and an excellent, widely available option. My favourite, though a little more expensive (and no good for any nut-allergy sufferers) is Nush Almond M*lk Ch*ese Natural. It’s gluten-free and has a lovely mild flavour. Add a bit of vegan whipping cream and sugar, and you have the bulk of your cheesecake filling.
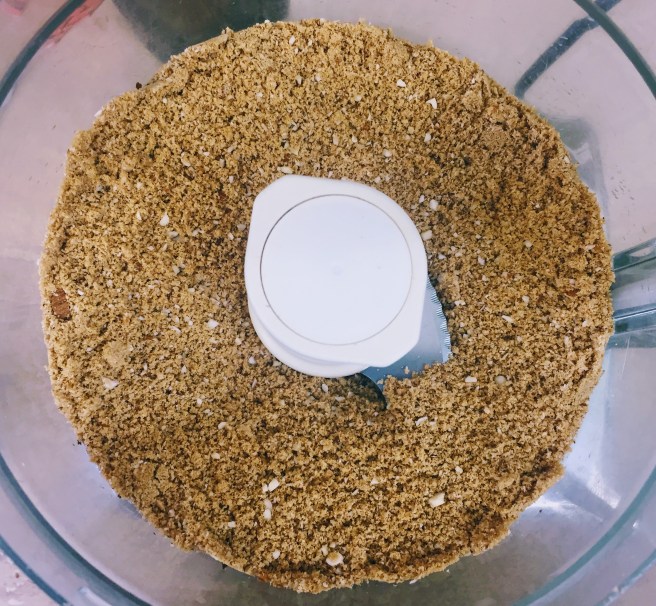
But let’s start at the beginning, with the base. I like a classic biscuit base, and some sort of oaty biscuit is my preference. Any oaty biscuit will do, but if you’re gluten-free, you can now buy gluten-free hobnobs in the UK, or Nairn’s have brought out ‘Oaties’ which are a delicious entirely oat-based biscuit. I had a packet of these, but not enough for the entire base, so I made up the rest of the weight with whole almonds, and blitzed everything in a food processor. You could even use equal parts rolled oats and almonds, or ground almonds, as long at the total weight is 250g.
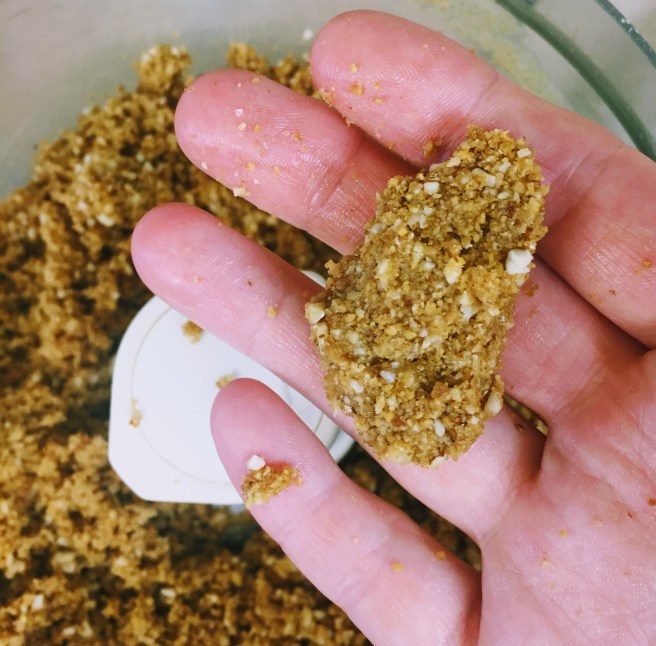
Different biscuit, oat and nut combinations will contain different amounts of sugar and fat, but the key is to get the mixture to the point where if you press a small amount together it will hold it’s shape well. Start by blitzing the biscuits, oats or nuts to a crumb, then add 75g vegan butter, margarine or coconut oil, and a pulse until the mixture starts to clump together. Test to see if it holds together, (100% biscuit bases should hold at this point), and if not, add another tablespoon of fat, blitz again, and repeat until you have the desired texture.
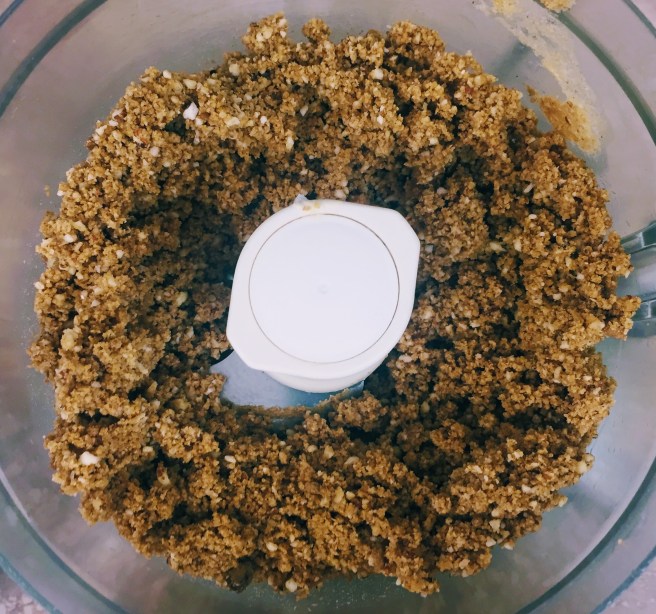

If you use a sweeter biscuit you may not need to add any sugar. Otherwise start with a tablespoon and a pinch of salt, pulse your food processor and taste, adding a little more until the mixture is as sweet as you want it. Tip the mixture into a greased and base-lined loose-bottomed tin until it forms an even compact layer, and refrigerate.
The next step is to make the raspberry sauce. This is going to flavour half of your cheesecake mixture, and the rest can be spooned on top for a tangy, fruity flourish. Our raspberry patch worked overtime last year so we still have raspberries in the freezer, but you could also use fresh. Put your raspberries in a small saucepan over a medium-low heat with a few tablespoons of sugar. Once the raspberries have started to disintegrate and release some of their juice, turn the heat up a touch, and let the raspberries bubble for a minute or two until there are no chunks remaining.

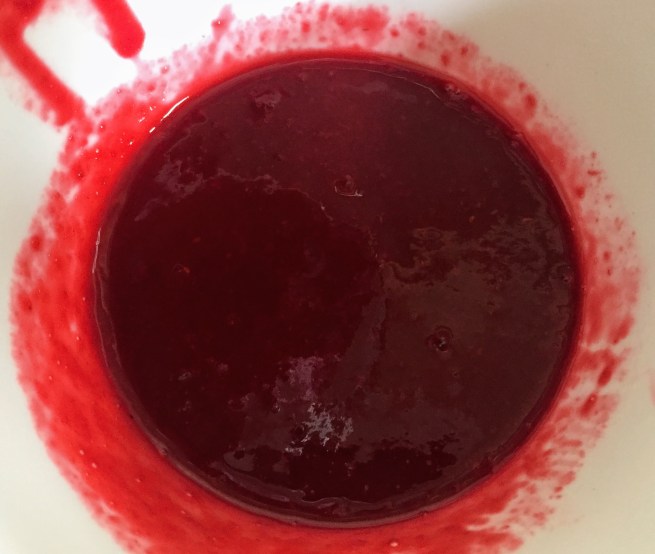
Sieve the mixture into a heat proof bowl – you’ll need to give it a good stir until only the seeds remain in the sieve. Don’t forget to scrape the bottom of the sieve as well, to waste none of the fruity goodness. Return the sauce to the saucepan and in a small bowl, mix a little corn flour with some lemon juice. Whisk in the cornflour mixture into the sauce over a medium heat, stirring constantly until the mixture has returned to the boil, then remove from the heat and leave to cool completely.
Finally to the filling. I used a vegan whipping cream, such as Emlea plant double, in which case you can add that along with the cream cheese to a large mixing bowl and whisk everything to firm peaks. You could also use the thick cream from the top of a refrigerated can of coconut milk, but this can be a little more temperamental. In this case I would whisk the coconut cream and the cream cheese separately, until both are smooth and light, then carefully fold them together with a spoon. Sieve in the icing sugar and whisk again to combine.

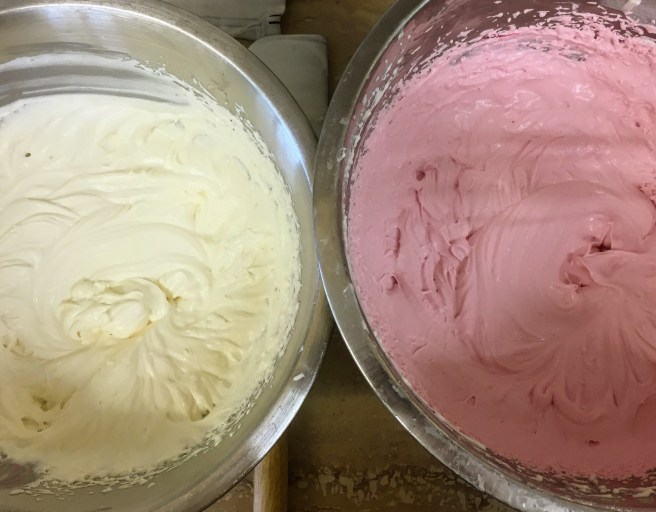
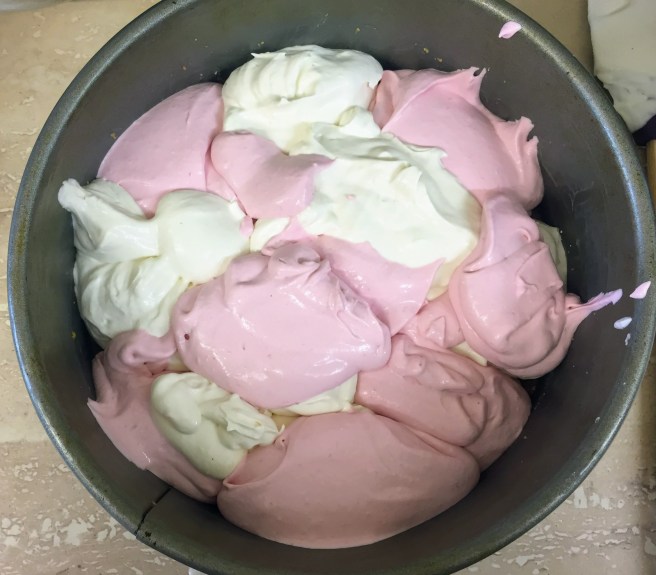
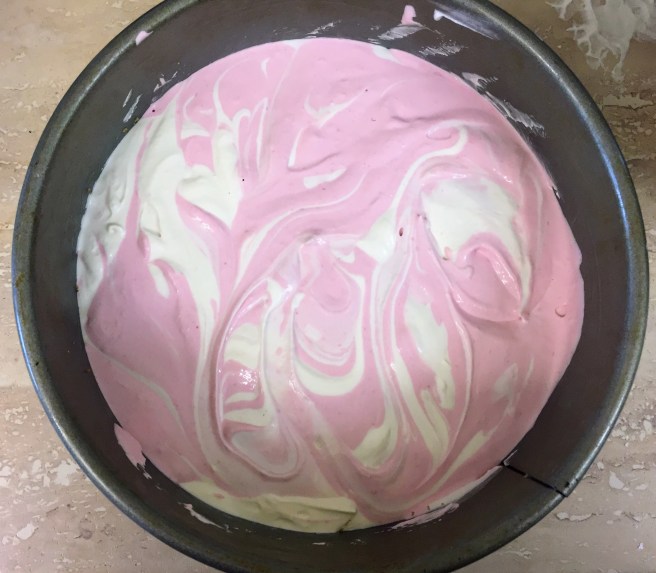
To flavour your mixture, spoon roughly half into a separate bowl, add the vanilla essence, and whisk until fully combined. To the remaining half, add a couple of tablespoons of room temperature raspberry sauce and whisk again. Spoon large blobs of mixture, alternating between vanilla and raspberry, onto your refrigerated biscuit base, then use a knife to swirl everything together. Too much swirling and colours will start to merge, so a little restraint is required. When you have a reasonably marbled effect, tap the tin gently on your work surface and shake a little until the mixture has leveled (too much tapping and you’ll knock out the air from the mixture, use a spatula or spoon and you’ll loose the beautiful marble effect!). Refrigerate for at least four hours before serving.
For a bit of decor, use the remaining raspberry sauce – you can warm it a little to loosen it so it becomes drizzlable, or spread it any which way you please. A few whole raspberries for good measure and you’ve got a dreamy, creamy dessert, fit for a queen, or indeed, a mother.
If you give this a try, I would love to hear how you get on! You can comment below or use the star rating at the top of the post, or follow and tag me on Twitter and Instagram @greedybearbakes.
Vegan Raspberry Ripple No-bake Cheesecake
A crumbly, biscuity base, piled with swirls of vanilla and raspberry flavoured cheesecake, with a sharp and sweet raspberry coulis
Ingredients
- 250g oat biscuits* (gluten-free if necessary)
- 75g vegan butter, spread, or coconut oil
- 1–3 tbsp soft light brown sugar or caster (optional)
- pinch salt
- 200g fresh or frozen raspberries + extra for decorating
- 4 tbsp caster sugar
- 1 tbsp lemon juice
- 1 tsp corn flour
- 300g vegan cream cheese
- 300ml vegan whipping cream (e.g. Elmlea Plant Double) or cream from 1 tin coconut milk**
- 75g icing sugar
- 1½ tsp vanilla extract
Directions
- Grease a loose-bottomed round cake tin (somewhere around 20cm diameter) and line the base with baking paper.
- Add 250g oat biscuits to a food processor and blitz to a crumb. Add 75g vegan butter and pulse until the mixture starts to clump together. Press a small piece between your fingers – if it crumbles easily add a little more butter a tablespoon at a time until it holds its shape. Add a pinch of salt, pulse to combine, then taste and add 1 and up to 3 tbsp soft light brown sugar until the mixture is sweet enough for your liking. Tip into the prepared cake tin and press into the base, until you have an even, compact layer. Refrigerate.
- Next, make the raspberry sauce. Add 200g raspberries to a small saucepan with 4 tbsp caster sugar. Heat over a medium-low heat until the raspberries start to release their juice, then turn the heat up a little. Let the sauce bubble for a minute or two until the raspberries have completely disintegrated, then sieve into a heatproof bowl, stirring the mixture vigorously until only the raspberry seeds are left. Scrape any sauce hanging off the bottom of the sieve into the bowl, and return the sauce to the saucepan. In separate small bowl mix together 1 tbsp lemon juice with 1 tsp corn flour. Whisk this mixture into the raspberry sauce over a medium heat until just starting to bubble, then remove from the heat and leave to cool completely.
- Add 300g vegan cream cheese to a large mixing bowl, along with 200ml vegan whipping cream (see notes if using coconut cream). Whisk until the mixture is smooth and light, and forms stiff peaks when you remove the beater from the mixture. Sieve in 75g icing sugar and whisk to combine.
- Transfer roughly half the mixture into a separate bowl, add 1½ tsp vanilla extract, and whisk to combine. When the raspberry sauce has thoroughly cooled, add 2 tbsp to the remaining mixture and whisk until fully incorporated.
- Remove the cheesecake base from the fridge and spoon large dollops of mixture, alternating between vanilla and raspberry, into the cake tin until all the mixture is used up. Use a knife to swirl the mixture a little, to create a marbled effect, then gently tap the tin on the work surface and shake until the filling levels out.
- Refrigerate for at least 4 hours. Serve with the remaining raspberry sauce, or spread the sauce over the top of the cheesecake and decorate with any additional raspberries.
Notes
*You can also use a combination of oat biscuits and almonds, or even rolled oats, as long as the total amount weighs 250g. You will need a little more butter (no more than 100g in total) and more sugar to taste.
**Refrigerate your tin of coconut milk for at least an hour so the cream rises to the top, then scoop the firm white cream out of the tin, avoiding as much of the liquid as possible. Whip the coconut cream and the vegan cream cheese separately, then gently fold together until completely incorporated. Some brands of coconut cream separate when whisked, so try to find a brand with a high fat content (50%+) that doesn’t contain guar gum.
